Tuesday, December 24, 2013

Around the World in 80 Doughs: #3 - Lithuanian Kūčiukai


The Story

Lithuania is a country rich in tradition, especially at Christmas time. One of Lithuania's great Christmas traditions is their Christmas Eve meal. Fresh straw symbolizing the manger that the Christ child was placed in is spread across the table and then a table cloth is put over it before setting and decorating the table. Places are set for loved ones who are away or have passed away in the previous year and a candle is lit on their plate. The belief is that their spirits would be present at the family meal. 

The Christmas meal itself does not include milk products, meat (except for fish), or eggs. Even so, there is a wealth of delicious foods served in twelve courses signifying the twelve apostles. Among the many plates served that night is a traditional poppy seed bread called Kūčiukai (pronounced Koo-Choo-Kaye). Since milk products are not allowed, a special milk is made by boiling poppy seeds and the Kūčiukai is eaten by soaking the small breads in the poppy milk.

The Bread

In keeping with the traditions surrounding the Christmas Eve meal, the Kūčiukai are made without any milk or eggs. Although recipes vary slightly, they are often a sweet bread baked with a hard crust on the outside and a softy chewy inside. They are also usually very small, usually only an inch or so cubed once baked. 

As mentioned above, the Kūčiukai is eaten during the Christmas Eve meal by putting several into a bowl or cup and soaking them in a special milk, called Aguonpienis (pronounced Ah-guon-pien-is), made by blending and squeezing poppy seeds boiled in water.

The Recipe

Ingredients for the Kūčiukai:
  • 1/2 Cup of warm water
  • 2 Tablespoons sugar
  • 1 Teaspoon dry yeast
  • 2 Cups flour
  • 1 Teaspoon salt
  • 1 Tablespoon cooking oil
  • 1/4 Cup poopy seeds
Dissolve the sugar into the warm water and add the dry yeast. Let this stand for a few minutes so that the yeast can cultivate. In the meantime, sift the flour into a large bowl and add the salt and poppy seeds. Mix the dry ingredients well. Add the oil and yeast mixture and knead together for about ten minutes until consistent. Let rise until the dough has doubled in size. 

Preheat oven to 350 degrees F. Cut dough into four equal parts. roll each part into long strands about 1/2 inch in diameter. Cut each strand into small cubes and place on a buttered cookie sheet. Bake for 15 to 20 minutes. 

Ingredients for the Aguonpienis:
  • 1/2 Lb. poppy seeds
  • 2 Cups boiling water
  • 1/4 Teaspoon almond extract
  • 1 Tablespoon honey
In a bowl or cooking pot, place the poppy seeds and our the boiling water over the seeds. Let stand for one hour. Afterwards, pour poppy seed mixture into a blender and add almond extract and honey. blend on high for three or four minutes until the mixture turns a white-ish brown color. Layer several layers of cheese cloth and pour a portion of the mixture into the cheese cloth. roll the cheese cloth around the mixture and squeeze tightly until all of the juice, or "milk", has been squeezed out. Throw the pulp out and repeat the process until all of the milk has been pressed out of the mixture. Refrigerate until serving time. 

To serve, place several Kūčiukai into a small bowl or mug and pour the Aguonpienis over them. Let the Kūčiukai soak before eating.


Saturday, August 10, 2013

Around the World in 80 Doughs: #2 - Bavarian Laugenbrezel


The Story

The pretzel, everyone knows it not only for its exquisite taste and texture, but more importantly for its unique, twisted shape. Today pretzels are made and sold in countries around the world. But where did they come from and how did they get their shape?

The origin of the Pretzel and its shape is more myth and legend than actual fact. The History of Science and Technology by Bryan Bunch and Alexander Hellemans details probably the most famous story behind this uniquely shaped bread. According to their account, in 610 AD, "...an Italian monk invents pretzels as a reward to children who learn their prayers. He calls the strips of dough, folded to resemble arms crossing the chest, 'pretiola' ("little rewards")".1 Unfortunately, for as popular as this story may be, no evidence exists to support it. 

Although this particular story may be just a legend, it is widely accepted that the bread's origin has its roots with early christians. The German name "brezel" is even derived from the Latin word bracchium meaning "arm" owing to the distinct resemblance of the pretzel shape with folded arms.1 

Another popular theory for the pretzel shape's origin dates back to the Roman era and resembles Roman ring-bread, which is a small, circular-shaped bread.

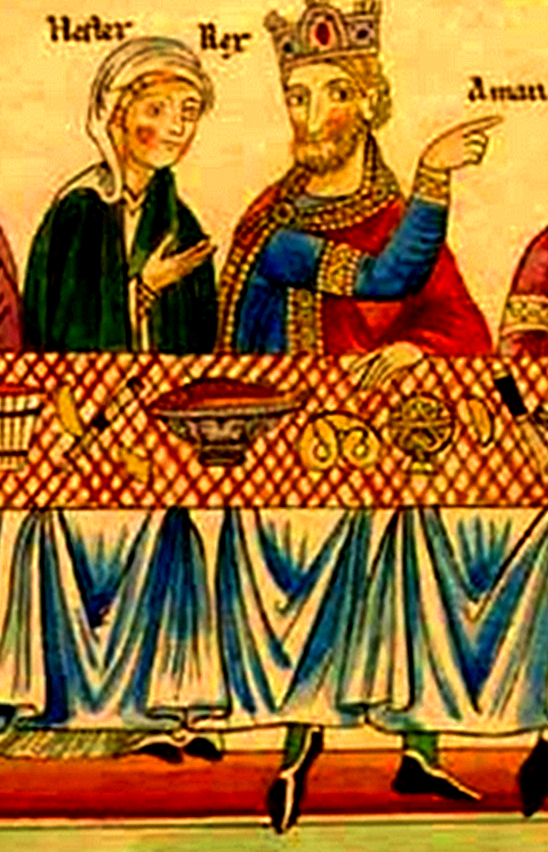
However the Pretzel got its shape, we know that it has been around for a very long time - at least as far back as the 12 century. In the Hortus deliciarum, a document dating back to the 12 century AD, there is an illustration showing a banquet with Queen Esther and King Ahasuerus in which a pretzel, with its distinct shape can clearly be seen on the table. 

Where it came from, we may never know. But one thing we do know, the Pretzel is here to stay. Particularly in Germanic countries, the pretzel has deep roots in their cultures and culinary history. The crest for the German Baker's Guild even displays a pretzel prominently on its shield.


Today, the Pretzel is used in many traditional celebrations as well. For Germans, it is a tradition to eat pretzels during the Good Friday dinner. Not only is the shape religious, but the bread consists of a simple recipe that does not contain eggs, lard, or dairy products which are forbidden during lent.2 Pretzels are also often associated with Easter. in some countries, pretzels were hidden for the children to find on Easter morning, and not eggs. Germans also associate the pretzel with good luck and good fortune. On New Years day, some exchange pretzels as a gift of luck for the coming year.

The Bread

Although there are many varieties of pretzel, the Laugenbrezel from Bavaria is probably the most common and traditional pretzel. The Laugenbrezel was actually invented by a Bavaria baker completely by accident. As the story goes, on February 11, 1839, a baker at the Munich Royal Café named Anton Nepomuk Pfanenbrenner was baking some sweet pretzels for his guests. His intention was to brush the pretzels with sugar water, but instead reached for the Natronlauge, a sodium hydroxide solution used to clean and disinfect the countertops. This would have been a serious Health Department violation and possibly a lawsuit today, but back then, the guests actually loved them!2

And so, although sodium hydroxide is a main active ingredient in drain cleaner, it is now a main ingredient in pretzels. To this day, the Laugenbrezel is dipped in a food-safe sodium hydroxide solution before baking. This is what gives the Laugenbrezel the hard brown crust and the soft center that is as signature to the pretzel as the shape.

The Recipe

As mentioned above, the secret to a good Laugenbrezel is the sodium hydroxide solution. If you are going to dip your food in sodium hydroxide, however, it is important to get a solution that is designed for and safe for food. Although people have sometimes commented on using soap-maker's sodium hydroxide, I would not advise anything that is not labeled food safe. I did find a small bottle (5 oz) of food grade sodium hydroxide online for relatively cheap from a company called Essential Depot (www.essentialdepot.com/servlet/the-547/5oz.-Food-Grade-Sodium/Detail) that you might want to check out. For my recipe, however, I found a recommendation to bake common baking soda in the oven as a way to imitate a sodium hydroxide solution. Baking soda is similar to sodium hydroxide, but not as powerful. When it is baked, however, the alkaline becomes more concentrated and it can work as a substitute for recipes like this. The substitute does not create a nice shiny brown crust like sodium hydroxide will (see my picture above), the crust is still crunchy and the inside is delightful.

To create the baking soda substitute, cover a cookie sheet with a layer of tin foil. Sprinkle baking soda on the tin foil and bake in the oven at 300 degrees F. for one hour. It is important to remember that when you take the baking soda out of the oven it will have a higher alkaline concentration and can irritate the skin. You should always handle the powder with gloves after removing from the oven. Store in a dry and sealed container so as not to allow the powder to collect moisture from the air.

Ingredients:
3 1/2 Cups of all-purpose flour
1 1/2 tsp yeast
1 tsp salt
1 tsp sugar
1/4 Cup butter
2/3 Cup warm water
1/2 Cup warm milk

Dissolve the sugar in the warm water and add the yeast to begin forming a yeast culture. While this is forming, add the other ingredients in a large mixing bowl. Add in the yeast culture and mix together to create a consistent dough. Knead the dough on a lightly floured surface until you can poke the dough with your finger and the dough springs back. Let the dough rise for one hour or until double in size. See my post on French Baguettes for tips on using your oven to help your dough rise if you can't find a warm place in your house (like when you bake bread at 10:00 at night like me). 

After the dough has risen to twice its size, break the dough down into little balls. I found that the dough makes a dozen 3 gram balls, but some people like larger 4 gram pretzels and the 4 gram balls are great for rolls too. I felt that 3 grams was a bit small for rolls. For our example here, though, I needed quantity over quality, so we went with 3 gram balls. 

Once all of your dough is broken down into balls, take each ball one by one and form pretzels (unless you want rolls, in which case, leave them as balls). To form a pretzel, I got my hands lightly wet and wet the countertop slightly by wiping my damp hand across it. This made the dough easier to roll. If the countertop and your hands are dry, the dough just tended to slide around and smash instead of roll. The idea when rolling is to get the edges thin while keeping the middle kind-of plump instead of being evenly rolled. Once you have rolled the ball out thin, twist the ends and fold them back on the body to form a pretzel knot. If you are struggling with this concept, there are several videos out there than demonstrate this. 

As you finish forming your pretzels, carefully place them in a ziplock bag and, when all of your pretzels are formed and bagged, put them in the freezer for one hour. Lightly freezing the pretzels hardens them so that they are easier to work with during the sodium hydroxide dipping process. 

After freezing your pretzels, you are ready for dipping and baking. During the dipping process, it is always a good idea to work with gloves and protective glasses. The sodium hydroxide solution or substitute solution can irritate if they come in contact with the eyes or skin. Also, be sure to clean up any splatters as they happen to avoid damage to surfaces (Pleasant warnings considering you're going to be eating this stuff in a few minutes, aren't they). Please be sure to read and adhere to all safety warnings when using the sodium hydroxide. Also, I have heard debates about what to put the solution in. I use a ceramic bowl for the solution, but I have heard of others using metal. 

My solution was a 4% mix which consisted of 2 teaspoons of powder to 2 Cups of water. 

Carefully stir the solution until the cloudy water becomes clear. This is how you know when the powder is fully dissolved. Now carefully dip each pretzel in the solution for 30 seconds. You may have to push them under the water as I found some pretzels (and particularly the rolls) wanted to float. After dipping, place the pretzels on a cookie sheet covered with a layer of parchment paper and immediately sprinkle with coarse salt or other desired topping. 

After dipping and salting, place the pretzels in the over at 450 degrees F. for about 15 minutes or until they are nice and brown on top. 

Once finished, remove from the oven and allow to cool. I got anxious on my first batch and wanted to try one fresh from the oven. I found that the pretzels stuck to the paper and tore in half when I tried to remove it. Once they cooled, though, they were easier to remove from the paper.

The Result

As I said earlier, using the baking soda substitute did not produce the dark brown crust I was going for, but the dough is top notch and the texture and flavor are amazing. It may seem like a lot of work at first, but it was lots of fun and well worth doing again. I'd say the pretzels were my favorite recipe so far and one I intend to continue to develop.

1 - www.bavarianpretzelfactory.com/history.html
2 - www.germanfoodguide.com/pretzel.cfm

Sunday, July 28, 2013

Maria Elena's Theme

Today's post is another dive into my sporadic archives. Many years ago (about eight to be exact), I heard a short melody in my head. I tinkered around for a few months whenever I was near a piano and a song started to develop. I really believe that some people have a gift to be able to sit down and write beautiful poems or compositions, or create amazing art. I am not one of these people. But every now and then, a spark of divine inspiration drifts from its normal path and lands on me and amazing things happen. This song is one of those amazing random inspirations.

After the song was complete, it was without a name for some time until I met my beautiful wife. When I left Chile to return to the United States, I dedicated this song to my wife and named it Maria Elena's Theme. Since that time, the song has had a special meaning in our home.

But time goes on and it has been years since I have played the song. I wrote the song without a good understanding of musical technique, so it was written in my own short hand and I am convinced that if I forgot the song entirely, no one else could pick it up and play it as it was intended. So I recently found an app where I could write the music and have it played back to me until I was convinced that it was played correctly.

Now, thanks to the amazing power of modern technology, Maria Elena's Theme makes its public debut for the first time in both print and audio form.


Saturday, July 20, 2013

My 1975 Bug

My younger brother Todd recently celebrated his birthday and I dusted off my poetry skills and wrote him a poem for his birthday. Todd has been driving old Volkswagen Beetles for several years now and we've had many interesting adventures with them. I took several of those adventures and incorporated them into this poem. So, I guess you could say this poem is based on a true story. Those of you driving bugs will understand.

Todd's 1975 Super Beetle


My 1975 Bug


Now Ali Baba had his forty thieves,
and a treasure in a secret hold.
And Midas had his special touch
That turned everything into gold.
Aladdin had a genie in a lamp
That he carried on a flying rug.
But I wouldn't trade a single one for my 1975 Bug!

The brake cable came from my old bike
And the seat belts from some old bus.
If it stalls once or twice in the turning lane,
No reason to raise a fuss!
The horn can bleat all by itself
When it comes around a curve,
But when you turn the key for the 18th time,
I just love to hear her purr.

She may be over twice my age,
But she's still the love of my life.
Any woman that doesn't love my bug
Could never be my wife!
Yah, she dribbles out on my driveway
And the paint's a bit thin on the hood, 
But when your car turns 40 too
Lets if she looks this good!

She's red on top, and white on the sides
And rust where the sun don't shine.
My bank account is always dry
But I'm so glad she's mine.
So if you see me comin' down the road
Be sure to slug your friend.
'Cause I'll be driving this old bug until the bitter end!

- Tory Norman
July 12, 2013

Thursday, July 18, 2013

Around the World in 80 Doughs: #1 - French Baguette

Crispy Home-made Baguettes

The Story

Bread is not only one of France's international icons, but has also been one of its most historically significant foods. For the peasants and common folk of pre-industrial France, bread was quite literally a staple of life. The peasants depended on bread as their main source of nutrition and it was common for an average male peasant to consume two to three pounds of bread per day. Although peasants at the time had access to other foods such as meats, dairy products, sea foods, and nuts, many of these were far too expensive for anything but special occasions such as weddings or religious festivals. For the majority of the year, the peasants lived on vegetables and, most importantly, bread. Although bread was the staple of life for early French peasants, it is not the common French breads we are accustomed to eating today. Early peasant breads were made using a variety of courser and more affordable grains such as wheat, rye, and buckwheat. Refined white flour was reserved only for the upper class. In fact, as prices for grains rose, bakers would often substitute ingredients such as sawdust, dirt, hay, or even dung to make the flour last longer and keep the bread affordable.

Not only did bread have a key role in the daily life of the French citizens, it also played an important part in the French revolution. A series of poor weather conditions in the late 1700s caused a severe grain shortage in France which, in turn, caused a bread shortage and extreme increases in the prices of grains and breads. Robbed of their main source of nutrition, peasants began “bread riots” which became more prominent throughout France. Starvation from lack of bread and other crops was one of the main reasons that lead up to the French Revolution. In fact, the riots that led up to the famous fall of the Bastille on July 14, 1789 began as a search for arms and bread. Michael R. Lynn, in his article Riots and Rye: Bread and the French Revolution recognized that it was “riots and, even more simply, the threat of rioting [that helped] propel the revolution forward and make it increasingly radical.”[i]

Once the new French government took power, availability of bread became an obvious concern. The new government heavily controlled bread prices and even controlled the way in which bread could be made. For a time, the government banned all bread making except one style called pain d' egalite, or “equality bread” which consisted of ¾ wheat flour and ¼ rye. Although price regulations for bread are no longer in effect, you will still find the price of bread consistent throughout France to this day.

The fact that so many laws have been written surrounding bread is itself a testimony to the importance of bread in the French culture. Another important law in the history of French bread was a law written in March of 1919 which stated that “It is forbidden to employ workers at bread and pastry making between ten in the evening and four in the morning.”[ii] Prior to the writing of this law, the common French bread was the Boule, a hearty, ball shaped loaf. But this traditional bread took considerable time to carefully knead and prepare. With bakers unable to come in before four in the morning, there was no way they would have enough time to prepare for the morning bread runs. The solution to this issue was discovered in a long thin bread that was invented in Vienna in the middle of the 19th century. Because of its particular shape and texture, it could be prepared much quicker making it easily available as a breakfast bread.

This style of bread has since become so popular in France it is almost the iconic symbol of French baking throughout the world. Today, when we think of picking up a French bread from the supermarket here in America, it is typically a rendition of this long, thin stick of a loaf which we even call “French Bread”. The actual name in French is a Baguette, which means “wand” because of its distinctive shape. Although there are many types of bread that carry the appearance of a French Baguette, not every one of them can carry that title. I believe that the French Baguette is the only bread that I have ever found which was protected by national law. In 1993, the French government enacted a law commonly known as “The Bread Law” which states that, for a bread to be considered a “traditional Baguette,” it “must be mixed, kneaded, leavened and baked on premise, without ever being frozen. They must also be additive-free and can contain only four precious ingredients – wheat flour, water, salt and yeast.”[iii]

The Bread

Since July celebrates France's independence as well, and bread played such an important role in the country's independence, it only seemed fitting to celebrate by making traditional bread. I've never been too keen on eating sawdust or dung, though, so I decided against making the traditional peasant breads that played such an important role in France's history. The Baguette is still of great cultural importance to the French people, and since it is the bread most people think about when they think about French bread today, that is what we are going to make instead.

Like many professional artisan breads, it is very difficult to reproduce a true Baguette in your home kitchen, but there are a few recipes out there that come close. However, you have to be very careful when choosing a Baguette recipe because, according to the 1993 Bread Law mentioned in the history above, many of these recipes can not legally call themselves a traditional Baguette since they use ingredients (most commonly honey) which are outside of the legal boundaries of a traditional Baguette. I am a purist when it comes to my breads though, and if I'm going to go to the trouble to make a Baguette, I want it to be a legal Baguette (after all, what other bread has legal requirements). Another limitation to the Baguette that is missing from many recipes comes from the method in which the Baguette is baked. French bakeries use deck ovens which inject steam during the baking process. The steam causes the dough crust to expand before setting and also melts the gluten in the crust. It's this steam injection process that creates the golden, crunch outside and the chewy, air-filled inside that is signature to a traditional Baguette. Unfortunately, most American ovens do not come equipped with steam injection, so reproducing this effect can be difficult at home. 

After doing some research online and experimenting in my kitchen a bit, I came up with the following recipe which stays true to the legal requirements and has, I feel, the right blend between simplicity and authenticity.

The Recipe

Makes 3 cookie sheet length loaves:

• 5 cups flour
• 2 cups warm water
• 3.5 teaspoons dry yeast
• 2.5 teaspoons salt

In a large mixing bowl, mix all of the dry ingredients together first. Then, slowly mix in the water. Remember that the texture of the bread is more important than the exact quantity of water. Continue adding water slowly until the dough is slightly stick, but no longer clings to your skin.

Remove dough from mixing bowl and, on a floured surface, push the dough out from the center, smearing it against the surface with the lower palm of your hand a few times to ensure all ingredients are well blended. Knead the dough until it becomes smooth and consistent. It is important not to over knead the bread. 

When the bread is smooth and consistent, cover and let rise for and hour and a half. Perhaps it is because of the climate, or because I tend to bake late at night, but I used to have trouble getting bread to rise properly. If you are in this camp, simply heat your oven to its lowest setting (about 100 degrees F) and turn it off. Then set your bread in there with an oven-safe pan of water and let it rise.

After it raises, cut the dough into three equal parts. Get out a large cookie sheet, drape a dish cloth over it and flour generously. Place each part of the dough on an un-floured surface and fold the dough over itself, rolling while pushing the dough outwards until it becomes a long snake. Once your snake is about the length of the cookie sheet, place it on the cookie sheet and lift the cloth along the long sides of the snake so that the floured cloth cradles the dough. Once all three parts have been rolled out and are on the cookie sheet, raise again for one hour.

Now comes the fun part. Preheat your oven to 450 degrees F. and place a metal (NOT glass!) oven-safe bowl or pan on the bottom rack of the oven. While this is heating, score your loaves by cutting four diagonal slashes in the top of each loaf using a very sharp knife (preferably a clean razor blade if available). Carefully slide the loaf off of the dish towel and onto the cookie sheet. Once the oven is hot, quickly place the sheet of loaves on the middle rack of the oven. Toss about 6 to 8 cubes into the metal bowl or pan on the bottom rack and quickly close the door of the oven. This creates an imitation steam injection which helps produce the texture that is so important for a good Baguette. Just a note: If you have a glass window on your oven door, you may want to cover it with a towel or be VERY careful tossing in the ice cubes as a sudden drastic change in temperature, like a fallen ice cube on a hot window, has been known to crack glass.

Once the bread is successfully in its artificial sauna, let bake for 15 minutes or until golden brown.

The Result

As I mentioned before, to make a genuine French Baguette, you need a steam injection oven, so I knew it wouldn't turn out as airy in the middle or as golden brown on the outside. I was pleased though at how crispy the outside did turn out and the inside was nice and chewy. Today I just got tipped off to an awesome little French Bakery around the corner from where I work, so the next step will be to buy an authentic Baguette and compare the taste and texture. Stay tuned for the results. In the meantime, my whole family is pleasantly pleased with the results of round one.


[i] Michael R., Lynn. N.p.. Web. 14 Jul 2013. <http://www.ultimatehistoryproject.com/bread.html>.
[ii] Bulletin des Lois de la République Française — Nouvelle Série — Année 1919 T.XI:241-264 B. No. 246 (p.769) - No. 13950
[iv] N.p.. Web. 14 Jul 2013. <http://www.lepetitfrancais.com/history>
[v] N.p.. Web. 14 Jul 2013. <https://en.wikipedia.org/wiki/Baguette>

Friday, July 12, 2013

The Match

One of the purposes of this blog was to have a more public place to start storing my poetry. I wouldn't consider myself a professional poet by any stretch of the imagination, but it is something I have tinkered with since I was a child. Today I dug up my old poems from High School. I'll admit some were a bit forced and some were just atrocious, but I have sifted through them and selected a few of my favorites.

This is one of my all-time favorites from my younger years. I felt inspired to write it while reflecting in the chapel one Sunday evening as I was waiting for my father to get out of meetings. It is entitled "The Match."


The Match

Life is vast, like a vacant field
As dark and black as night.
The fog and haze restricts your view
Filling your heart with fright. 
You continue to wander, hopelessly lost,
All alone and afraid.
Voices are heard, but no man is seen
As you turn to the calls that are made.
Then off in the distance
Something pierces the night, 
A small and humble glow.
Just seeing this light amid the black 
Warms your very soul. 
As you draw nearer, you can see
The source of this meager light.
A man stands before you, half hidden in fog
Alone on this empty night. 
He holds out his hand to reveal a match, 
Its flicker so gentle and dim.
You're surprised that such a little light 
Could have guided you straight to him.
He smiles at you with a smile of love.
"I knew you would come," he said.
 Extending his hand, he gives you a match
With its unlit top of red.
Placing his match aside of yours 
The man shares his light with you. 
Now holding your match up with his
That match has the strength of two.
People come from far and near
Guided by the glow.
Each is given a match to hold
And the light begins to grow.
Now there are many standing around 
Making it bright as day
And out of the night shines the beautiful light
Guiding others on their way.

Christ stands amid life's troubles and strife
Holding his little light.
That flickering flame is the gospel light
Guiding us all to the right.
He welcomes us to take his light
And to the world show
That by guiding others we may see 
His gospel light will grow.

- Tory Norman
January 14, 2001

Thursday, July 11, 2013

Becoming a Published Author


Ever since I was a little kid, I had always dreamed of becoming a published author. Perhaps part of it was seeing your name in print, but it also goes back to my core passions. I have always loved to share information. I love to constantly learn and discover new things. So for me, it seemed only natural to want to publish my discoveries to the world in hopes that they can help others in some way.

This month I had the incredible opportunity to create my first published work. I actually can't take all of the credit though. In fact, none of this would have been possible without the help of the awesome people that I work with at Squire & Company in Orem. the Partner over our department and my manager, Kevin Johnson, approached me to help Kevin coauthor the cover story for The Journal Entry, a quarterly publication for the Utah Association of Certified Public Accountants. With Kevin's help, we were able to put together a great article on barriers to adopting new technology in business and how to overcome them. 

From this experience I saw a realization of something that I learned in college. As you start your career, find those around you who are moving in the direction that you want to go and then follow them. The people at Squire, particularly my managers are all great people who I look up to and admire. It is because of their mentoring that I am finally beginning to accomplish my childhood dreams.

So now that I have accomplished my goal of becoming a published author, is this the end of my writing career? On the contrary, I hope it is just beginning. It's a different animal working against publication deadlines, but it was a lot of fun. I hope to get additional opportunities to write articles. I am working on another major project as well, but that's under wraps for right now. Stay tuned to hear more as that one nears completion.

LinkWithin